You can compress images without losing quality in two ways. Lossless compression makes the file smaller while keeping every pixel identical, but the saving is usually modest. Lossy compression saves far more by discarding detail you're unlikely to notice, so the practical goal is "no visible loss": resize first, compress at a sensible setting, then compare the result with the original at the size it will be shown.
What "without losing quality" really means
There are two kinds of compression, and they make very different promises.
Lossless compression stores the same image more efficiently. What you get back is pixel-for-pixel identical to the original. Typical tricks include removing hidden extra data, using better compression settings inside the format, and re-packing a JPG's data more efficiently without changing the picture. It's completely safe, but the file often shrinks by only a modest amount.
Lossy compression throws some information away for good. Formats like JPG are designed around how people see, so fine detail in busy areas can go without anyone noticing. Done well, the file can be a fraction of the size and look the same at normal viewing size. Done badly, you get blurring, blocky patches and banding in smooth areas such as skies and plain studio backgrounds.
So when people say "compress without losing quality", they usually mean "compress until just before anyone could see a difference". That's a judgement you make by eye, and it's easier than it sounds.
Which approach for which image?
The right method depends on what's in the picture.
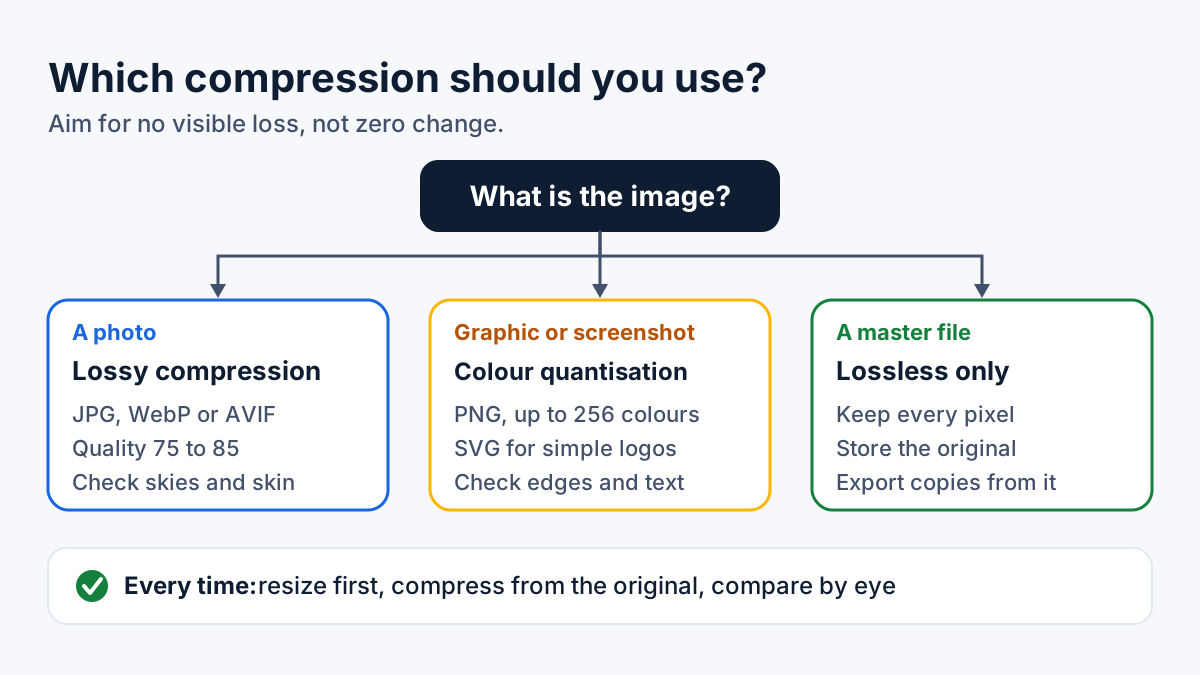
Match the compression to the image, then check the result by eye.
| Image | Best approach | Watch for |
|---|---|---|
| Product or lifestyle photo | Lossy JPG (or WebP/AVIF), quality about 75 to 85 | Banding on plain backgrounds |
| Logo or icon | SVG if you have it, otherwise PNG with colour quantisation | Fuzzy or jagged edges |
| Screenshot with text | PNG, quantised or lossless | Blurry text if saved as JPG |
| Graphic with transparency | PNG (quantised) or WebP | Halos around edges |
| Master or original file | No lossy compression at all | Keep it untouched |
Newer formats such as WebP and AVIF usually give smaller files than JPG or PNG at similar quality. Our comparison of WebP vs AVIF vs JPG vs PNG explains when each makes sense.
Step 1: get the dimensions right first
The biggest saving often comes from not sending pixels nobody sees. A phone photo can be 4,000 pixels wide, while a product image on most websites is shown far smaller. Resize to roughly the largest size the image is displayed at (up to about double that for crisp results on high-resolution screens), then compress. Our earlier guide to image sizes, WebP and compression gives rough sizes for common layouts.
Marketplaces are different. At the time of writing (October 2026), eBay UK recommends images of about 1,600 × 1,600 pixels and accepts files up to 12MB, because buyers zoom in. Don't shrink marketplace photos to website sizes.
Step 2: compress JPG photos
JPG is still the standard format for photos, and it's lossy. Most tools give you a quality setting from 0 to 100, where a lower number means a smaller file.
- Start around 75 to 85 for website photos, then adjust by eye.
- Use a modern encoder. MozJPEG, an encoder from Mozilla, aims for smaller JPG files at the same visual quality while staying compatible with standard JPG viewers. Desirly's JPG compressor uses MozJPEG.
- Compress from the original every time. Each lossy save can lose a little more detail, so keep your original and export from it rather than re-compressing a file that's already been compressed.
- Don't carry data you don't need. Camera files can include extra information such as camera settings and sometimes the location where the photo was taken, which adds bytes and may be more than you want to share.
As a benchmark, Google's Lighthouse performance check re-compresses JPG images at quality 85 and flags any where that would save 4 KiB or more (newer versions of Lighthouse report this under "Improve image delivery"). If your photos get flagged, there's room to compress.
Step 3: compress PNG graphics
PNG is lossless, which makes it great for logos, icons, screenshots and graphics with transparency, but heavy for photos. There are two ways to shrink a PNG:
- Lossless optimisation recompresses the file without changing a single pixel. Safe, but the saving is often modest.
- Colour quantisation reduces the image to a smaller palette of up to 256 carefully chosen colours, so the result looks almost identical. This is the technique behind tools such as TinyPNG and the open-source pngquant, whose website says it often cuts file sizes by as much as 70% while keeping full transparency.
Quantisation is technically lossy, but on flat graphics, logos and screenshots it's usually invisible. On photos or images with smooth gradients it can cause visible banding, so check carefully or use JPG or WebP instead. Desirly's PNG compressor uses colour quantisation in the same way.
Step 4: check the result by eye
Compression settings are a starting point, not a guarantee. Before you publish:
- View at the real display size, then zoom to 100% for a closer look.
- Check the danger zones: skies, gradients, skin tones, text and sharp edges, and fine patterns such as fabric or wood grain.
- Compare side by side. The free image compressor shows a before and after preview with a quality slider, so you can lower the quality step by step until you spot a change, then go back one step.
- If you can't see a difference, try a little lower.
A quick workflow for a whole batch
- Copy your originals into a separate folder and leave them alone.
- Resize the copies to the size they'll be displayed at.
- Add the whole batch to the image compressor.
- Set the quality and check two or three of the most detailed images in the preview.
- Download everything as a ZIP and upload the new versions.
- Re-test your page speed to confirm the improvement.
If a form or platform demands a file under a certain size, such as 200 KB, Desirly's tool for reducing an image to a target size in KB saves you trial and error.
A worked example (hypothetical)
Imagine a small shop's home page with 12 product photos taken on a phone, each around 3.5MB, plus a 90 KB PNG logo.
- Resizing the photos to 1,200 pixels wide brings each one down to a few hundred KB.
- Compressing them as JPG at quality 80 with MozJPEG takes each one to roughly 120 to 180 KB.
- Quantising the logo PNG brings it to around 25 KB with no visible change.
The page's images drop from about 42MB to around 2MB, and nobody browsing at normal size would see a difference. Your own figures will vary with the photos, but savings on this scale are common when originals have been uploaded straight from a phone.
Images are often the quickest win, but they're rarely the only cause of a slow site. If yours still drags after this, our website speed optimisation service can look at the whole page.
Frequently asked questions
Does compressing an image reduce its resolution?
No. Compression and resizing are different things. Compression reduces the file size while keeping the same pixel dimensions; resizing changes the number of pixels. For the best results, do both: resize to the display size, then compress.
What quality setting should I use for JPG?
Around 75 to 85 is a good starting point for website photos. Busy, detailed photos often look fine lower down; images with large smooth areas may need a little more. Always check by eye, because each tool maps its quality numbers slightly differently.
Is PNG compression lossless?
The PNG format itself is lossless, and lossless optimisation keeps every pixel. Colour quantisation, which most "compress PNG" tools use, reduces the number of colours, so it's technically lossy, even though the change is usually invisible on graphics and screenshots.
Will compressed images still be accepted by marketplaces?
Usually, as long as they meet each platform's current format, size and dimension rules. Marketplaces tend to want large, sharp images for zooming, so check their requirements and don't over-compress product photos.
Sources
This guide is general information, not legal, tax or financial advice. Fees, rules and thresholds change, so check the official source before you act. Spotted something out of date? Tell us and we will review it.